I got the cutting gear out on Sunday with the simple aim of cleaning
up the remnants of the thick central plate from the north end dragbox,
to match the south end which I'd done a fortnight earlier.
Having done that, I looked around for something else to cut off,
and settled on chopping off the remaining central stub of the frame
extension at the north end. This, of course, formed part of the
conventional dragbox on the wagon in its modified form, so there was
no going back now! |

Photo © P. Hetherington 30/04/06 |
That done, I thought I might as well carry on and cut out the
pieces of angle on the inside of the conventional dragbox. This took
rather a long time due to the difficulties of actually getting at
them - in the end I generated quite a few inch squares of scrap
metal.
On the basis that if I was going to immobilise the wagon for a bit,
I might as well do it properly... I returned to the south end of the
wagon and chopped off the central portion of the frame extension from
that end too! |

Photo © P. Hetherington 30/04/06 |
| Meanwhile, Shawn carried on with the removal of the horizontal top
plates from the north end Freightliner dragbox. By the end of Monday the
last plates were off, with just a little tidying up with the grinder needed
before we're ready for welding on the new gusset plates. The equivalent
horizontal top plates are still there at the south end though... |

Photo © P. Hetherington 30/04/06 |
| After that, Shawn decided to grind flush the central portion of the
north end headstock where I'd cut off the frame extension. A quick coat
of primer will keep the rust at bay, but of course we have some bits to
weld back on before we can paint these areas properly. |

Photo © P. Hetherington 01/05/06 |
Meanwhile, I started Monday by chopping out the redundant pieces of
angle from inside the south end conventional dragbox. The access was
a little easier at the south (non-tensioning) end but it still took
several hours.
These angles need to be replaced by two pieces of channel - seven inches
wide by approximately two (bottom) or three (top) inches high - as
the pieces of angle were too close together for the coupling hook to go
any further in, and didn't give enough depth.
As a temporary measure I've made a rough-cut inner plate out of a piece
of scrap steel channel (ex-Freightliner dragbox!) to allow us to
re-assemble the drawhooks on a 'loose fit' basis if the wagon needs to
be moved for any reason. |
Having done that, I think I've finished the gas-cutting
phase, unless we find any stubborn nuts and bolts later on. So, having
got the kit handy, I did a bit of heating and bending.
Firstly I straightened some of the brackets designed to catch the brake
rigging if it falls off, as a few of them were a bit crooked.
Next, I had a go at straightening the handles of the load-tensioning
screws. I get the impression that these can never have been totally
straight even when new, but they're now as good as they're ever likely
to be and certainly straight enough to avoid getting your knuckles
skinned between the screw handles and the wagon body. |
And finally... a few weeks ago I bought some steel strip with
which to make a new lamp bracket and three new vacuum dummy brackets.
I still have to drill holes and finish them off, but I bent them
to shape and cut the three vacuum dummy brackets to length. The twist
I've put in the vacuum dummy brackets is less than that in the one
surviving bracket on my Conflat (which explains why I made three
brackets...) - but more than that on another wagon I looked at nearby,
so I came to the conclusion that it probably isn't that critical.
All in all a good two days' work. There is really nothing much left
of the Freightliner modifications now, with 'only a bit of grinding'
to do before we can start putting things back on. There is, however,
one element of the Freightliner modifications which we haven't yet
touched. I leave the reader to work out what this is... my only clue
is to look through the archives to see what we were doing this time
last year. Hasn't time flown? |

Photo © P. Hetherington 01/05/06 |

Photo © P. Hetherington 07/05/06 |
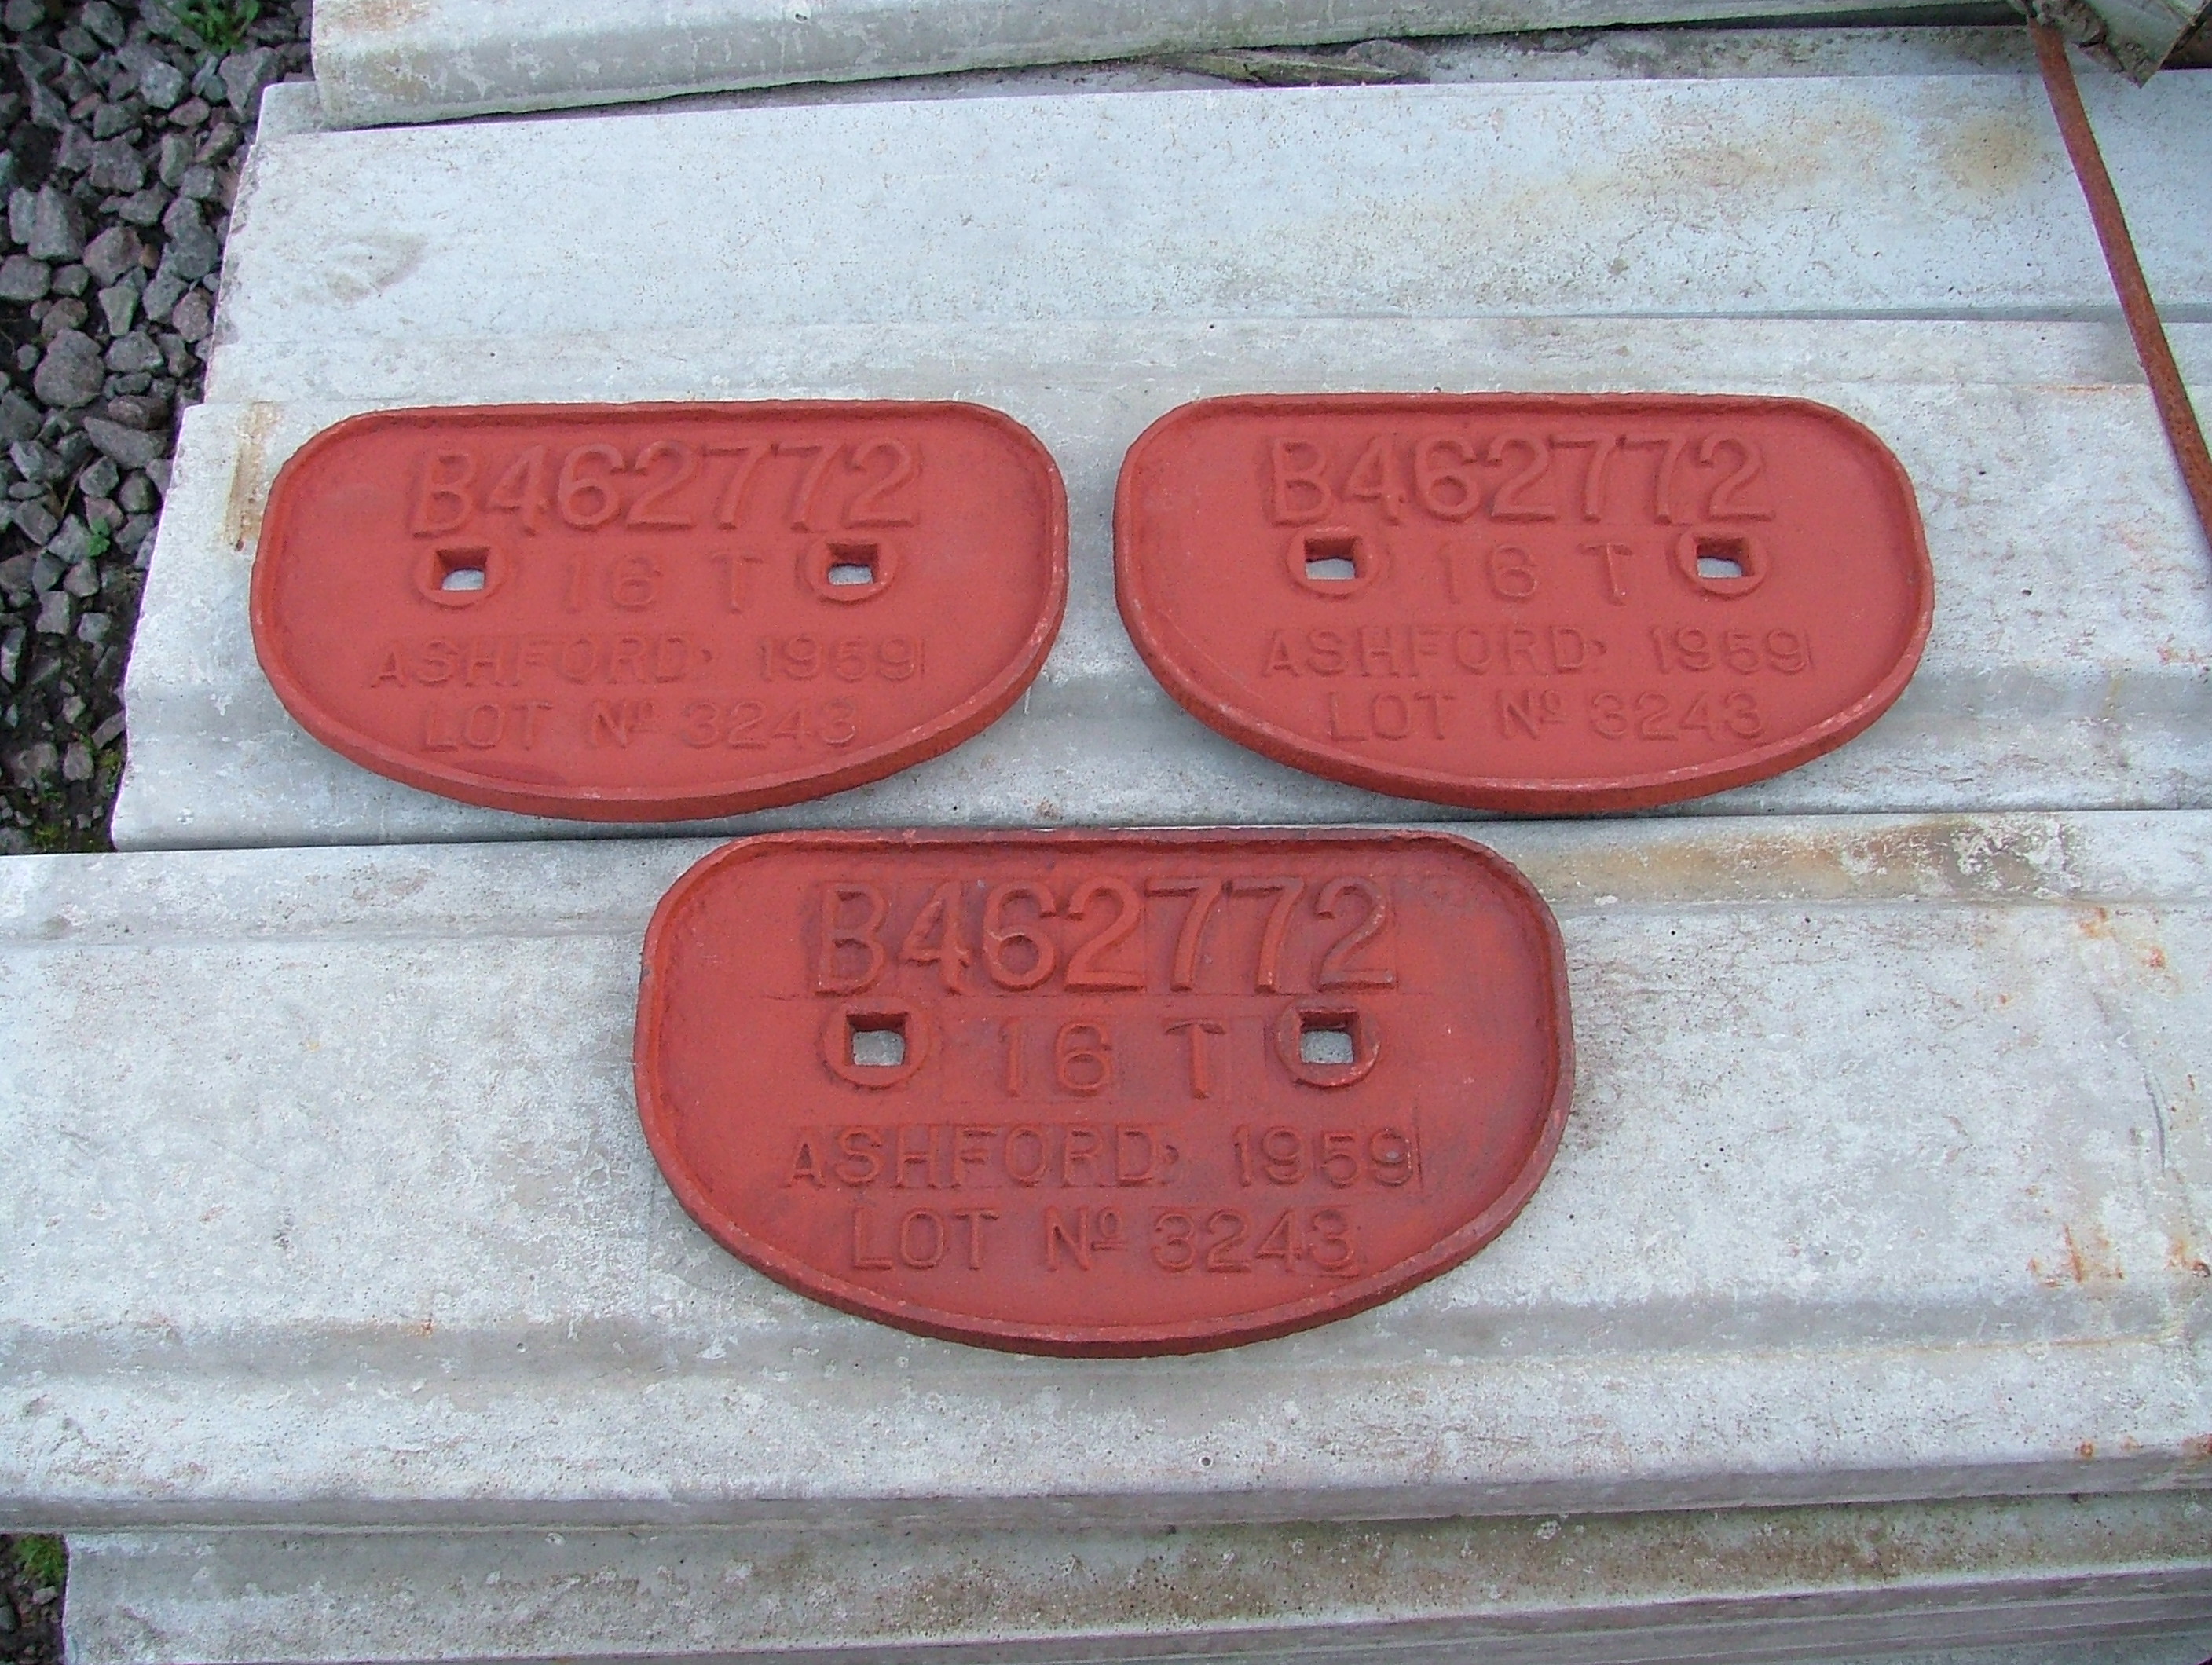
First job on Saturday was a trip to the Nottingham Transport Heritage
Centre at Ruddington to pick up two replica works plates.
I decided to get two replicas cast so that the surviving original
can go on my living room wall (well... maybe). As the original
was used as a pattern they're very slightly smaller due to the
shrinkage. Thanks to Alan Watson of the 2028 Simplex
Association for organising these for me. |

Photo © P. Hetherington 07/05/06 |
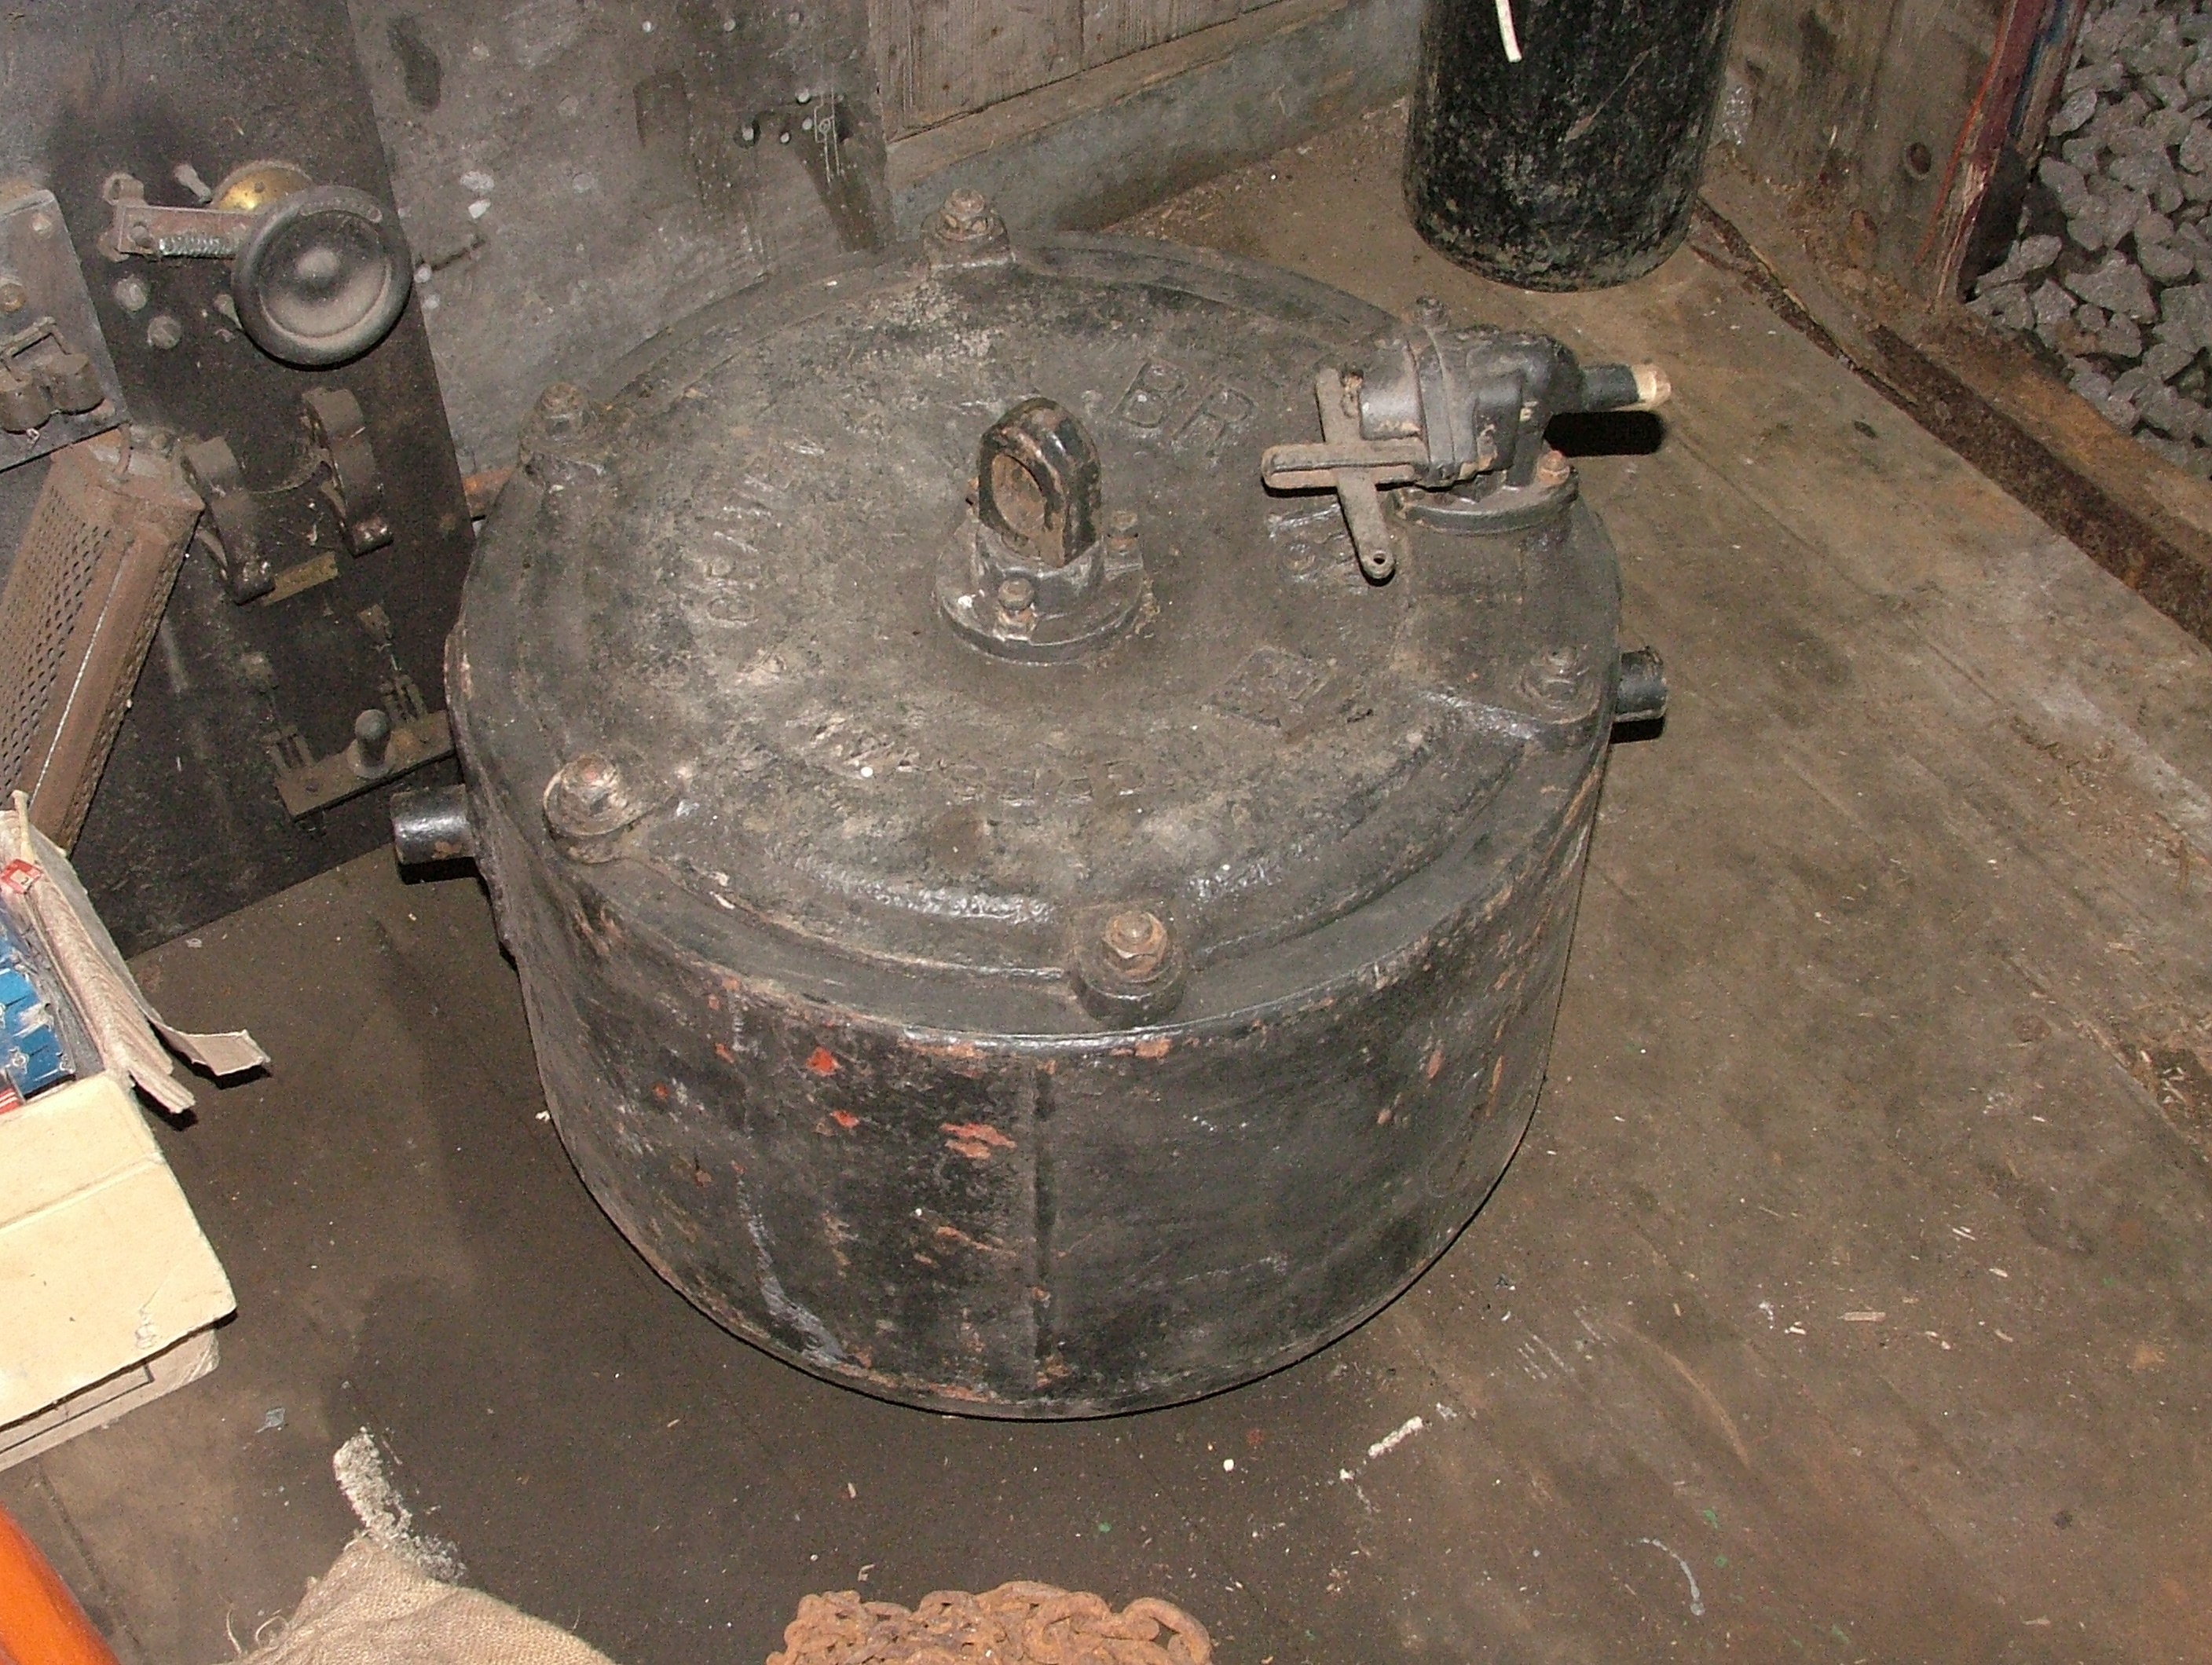
Next it was back to the GCR
in Leicestershire, and the arrival - at last! - of a vacuum cylinder
for this wagon. There have been a few false starts, not all reported
here, but Dave Turnock of the Churnet Valley Railway
eventually sourced this one. It's still under warranty too, despite
being second-hand, so it can go straight on the wagon needing nothing
more than a lick of paint.
And yes, I know it's the wrong way up. It won't be like that for
long. |

Photo © P. Hetherington 07/05/06 |
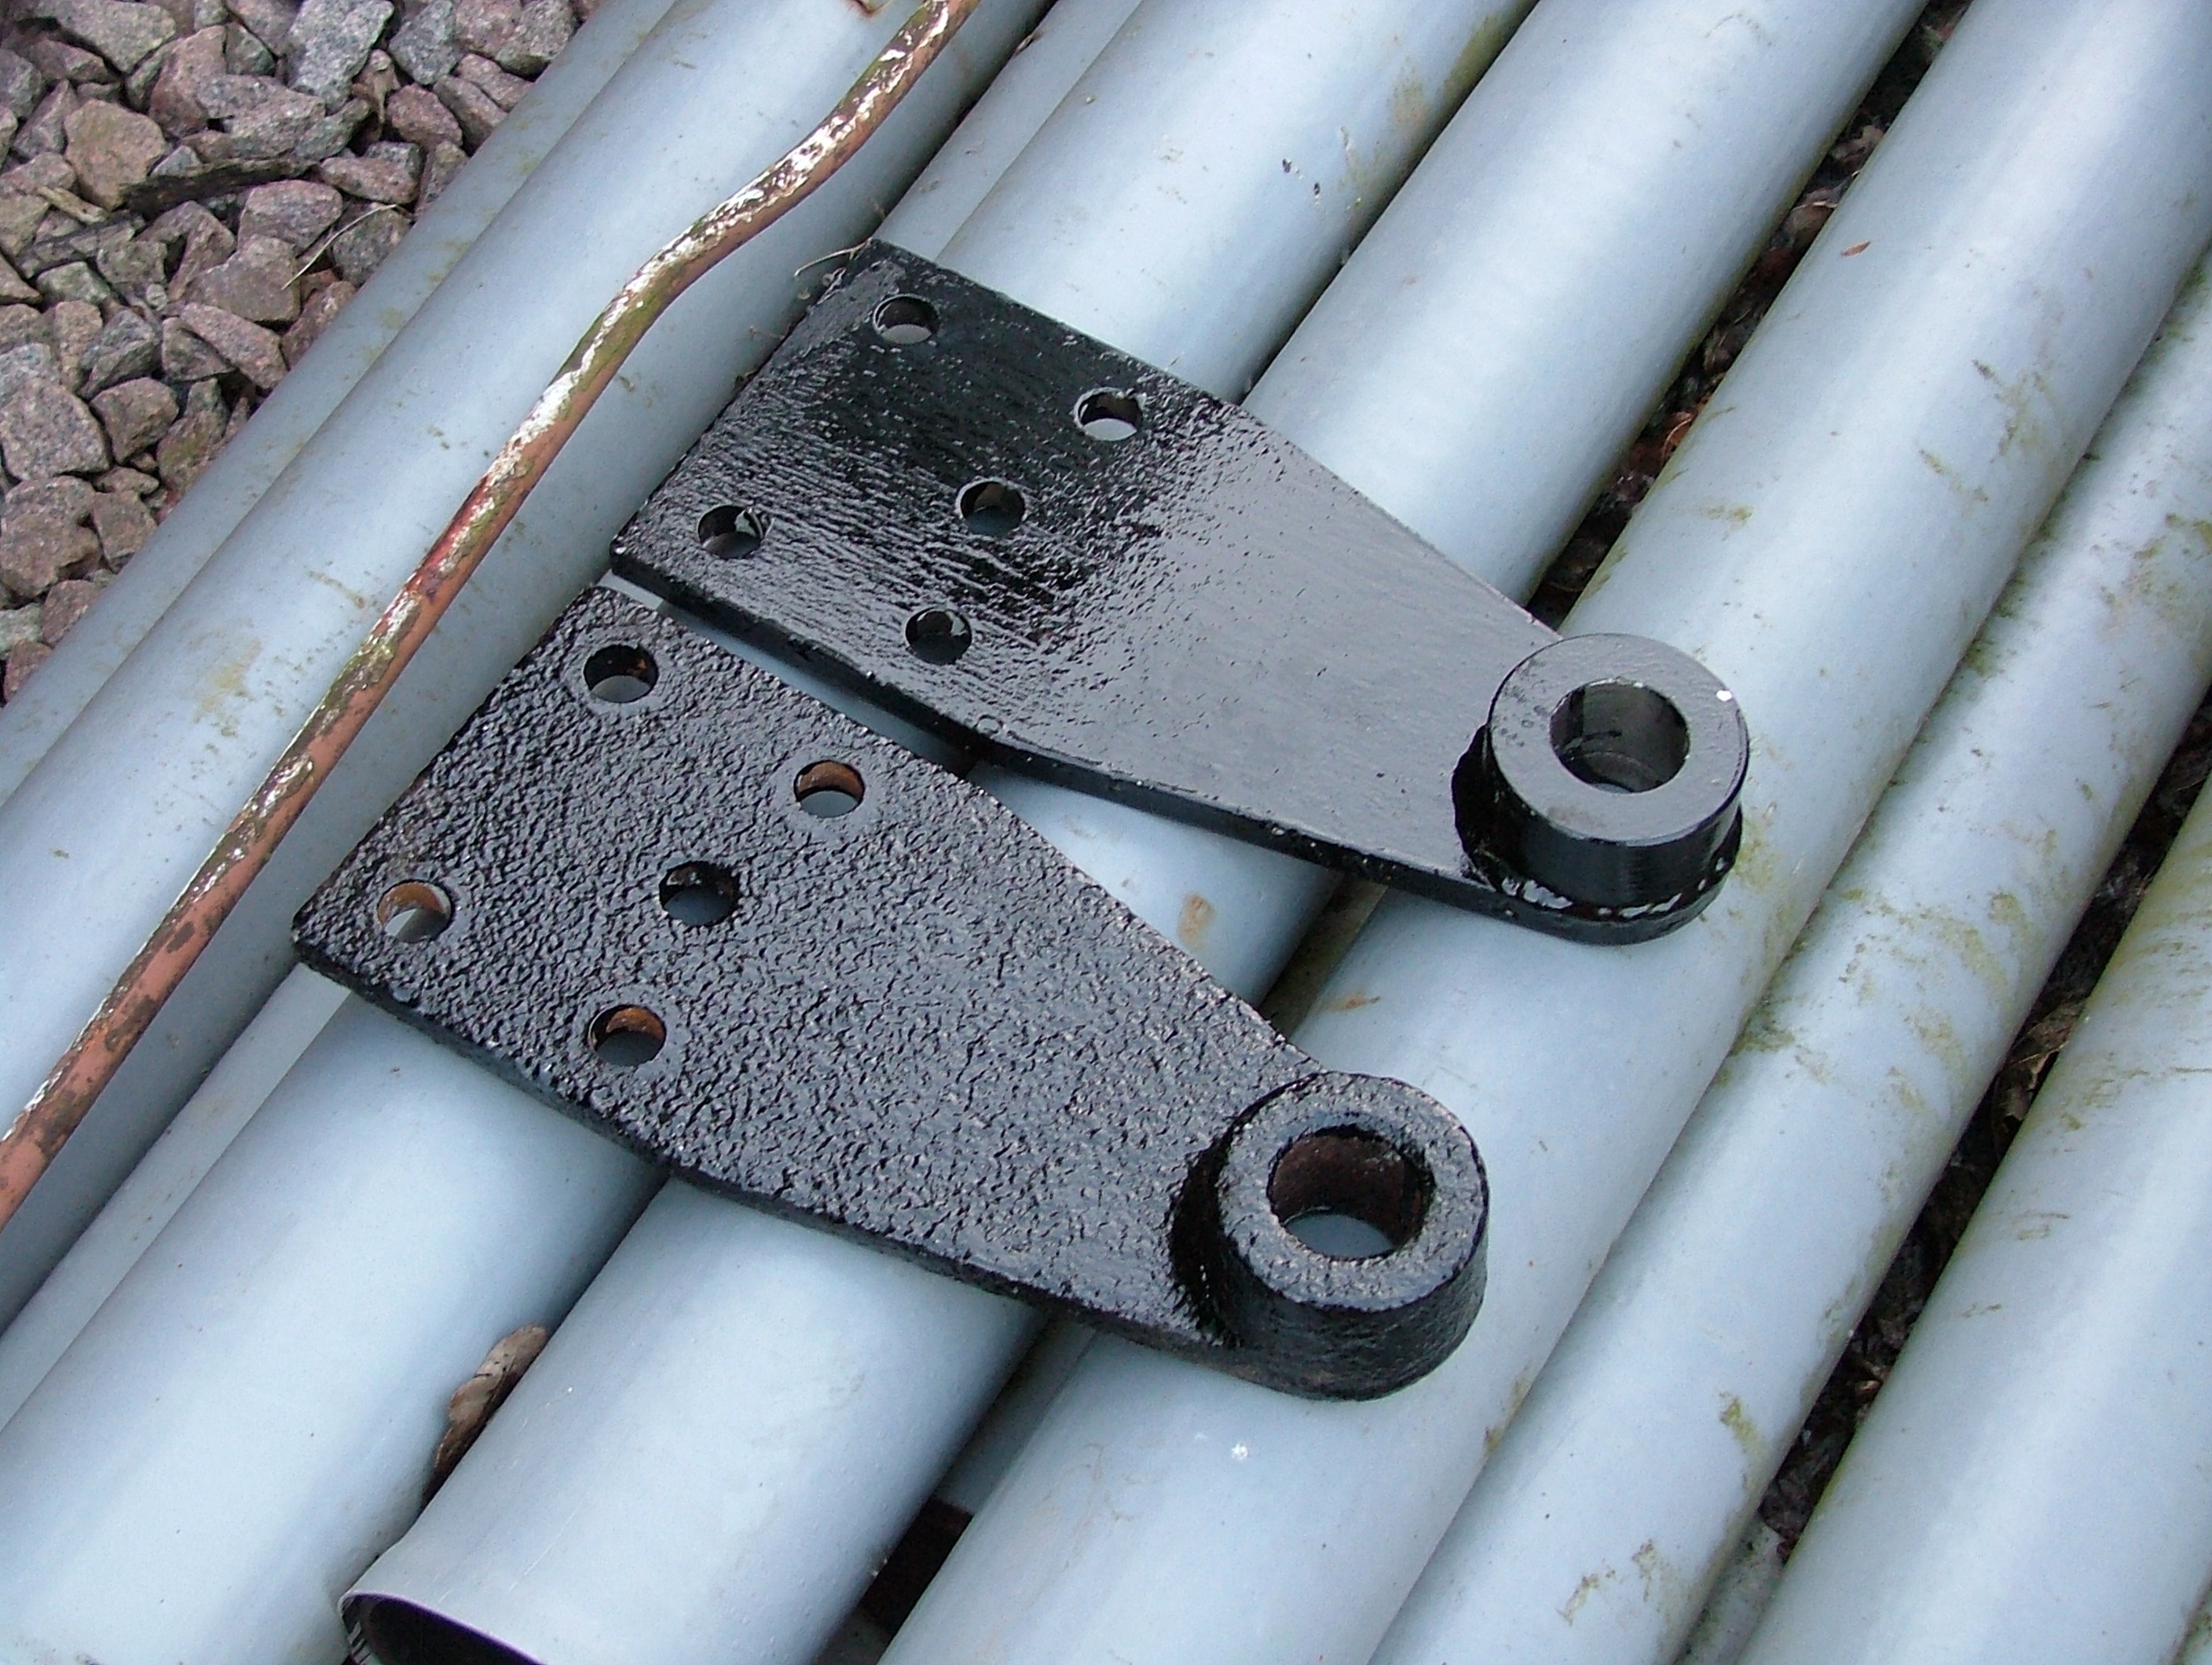
A vacuum cylinder is no use to me without a pair of trunions to
hang it from, and so having failed to find a second hand one of
the right type (every other wagon seems to have three holes instead
of four!), I sought quotes for having one made. Having been
scared off by my local engineering firm's rates, I asked Dave if
he could try his local firm, Ecam Engineering in Cheadle. They
came up with a good price, and here it is. The original (cast or
forged?) trunion is in the foreground; the new one behind it has
been fabricated. |

Photo © P. Hetherington 07/05/06 |
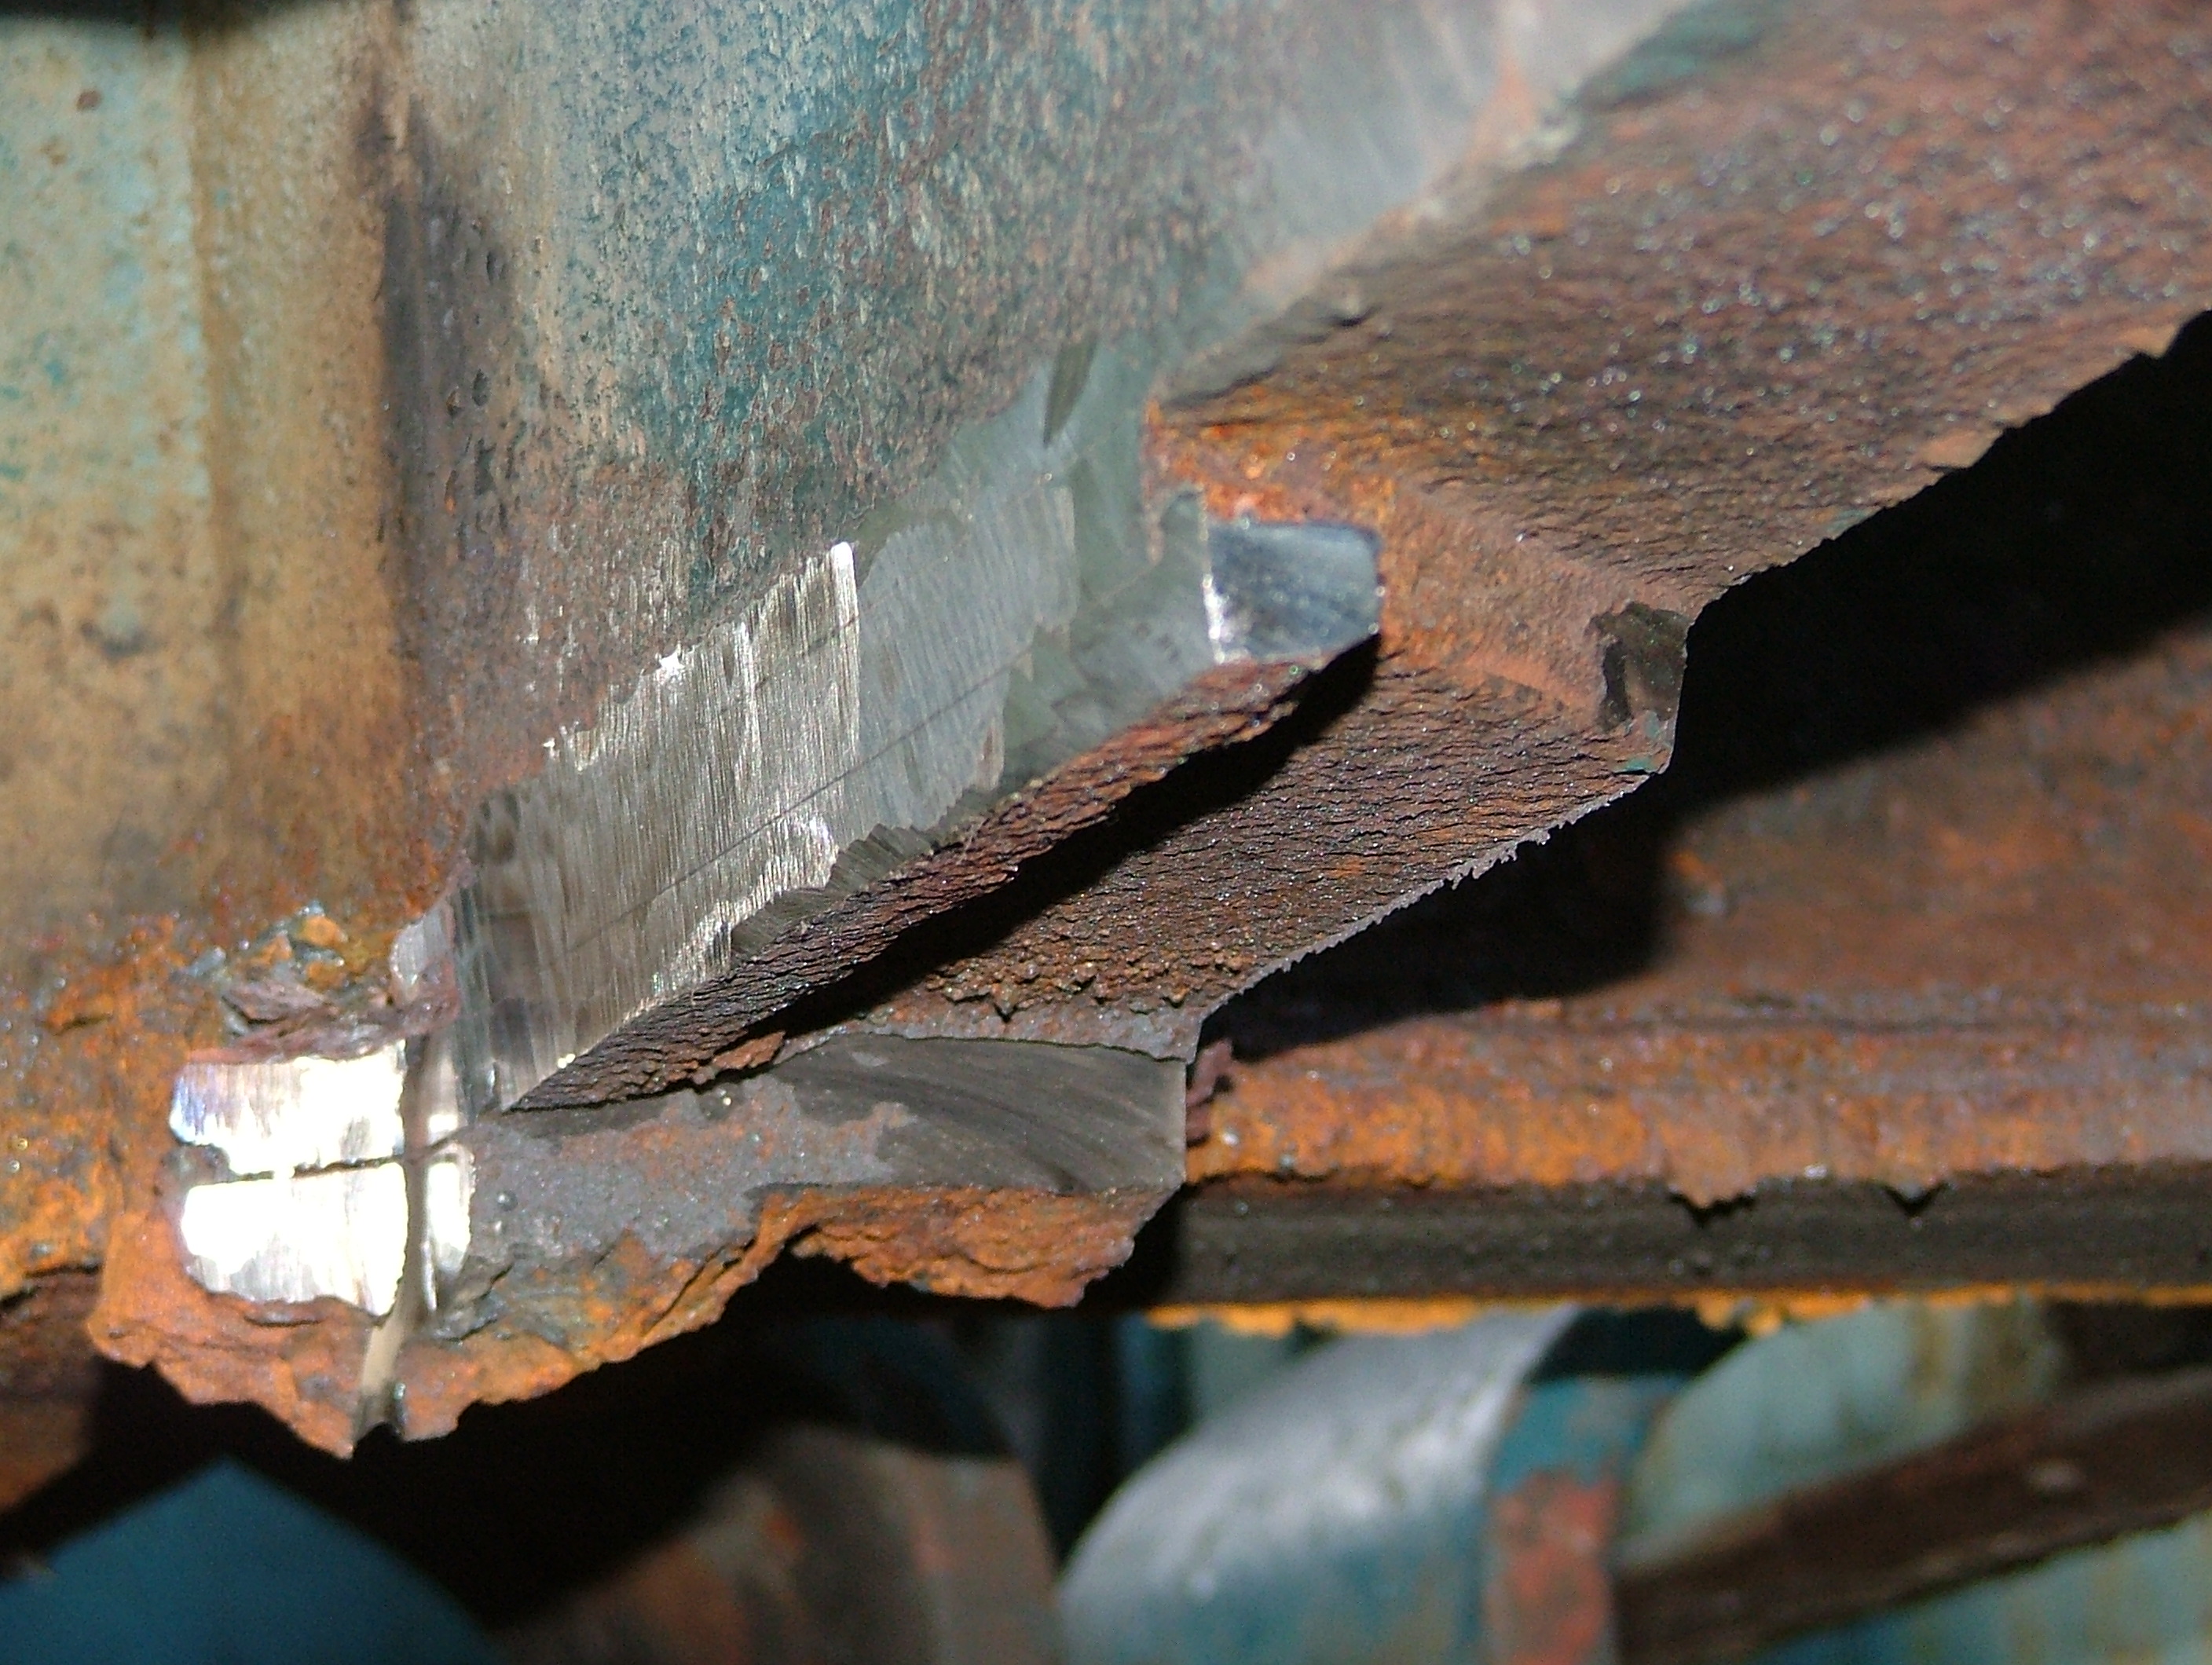
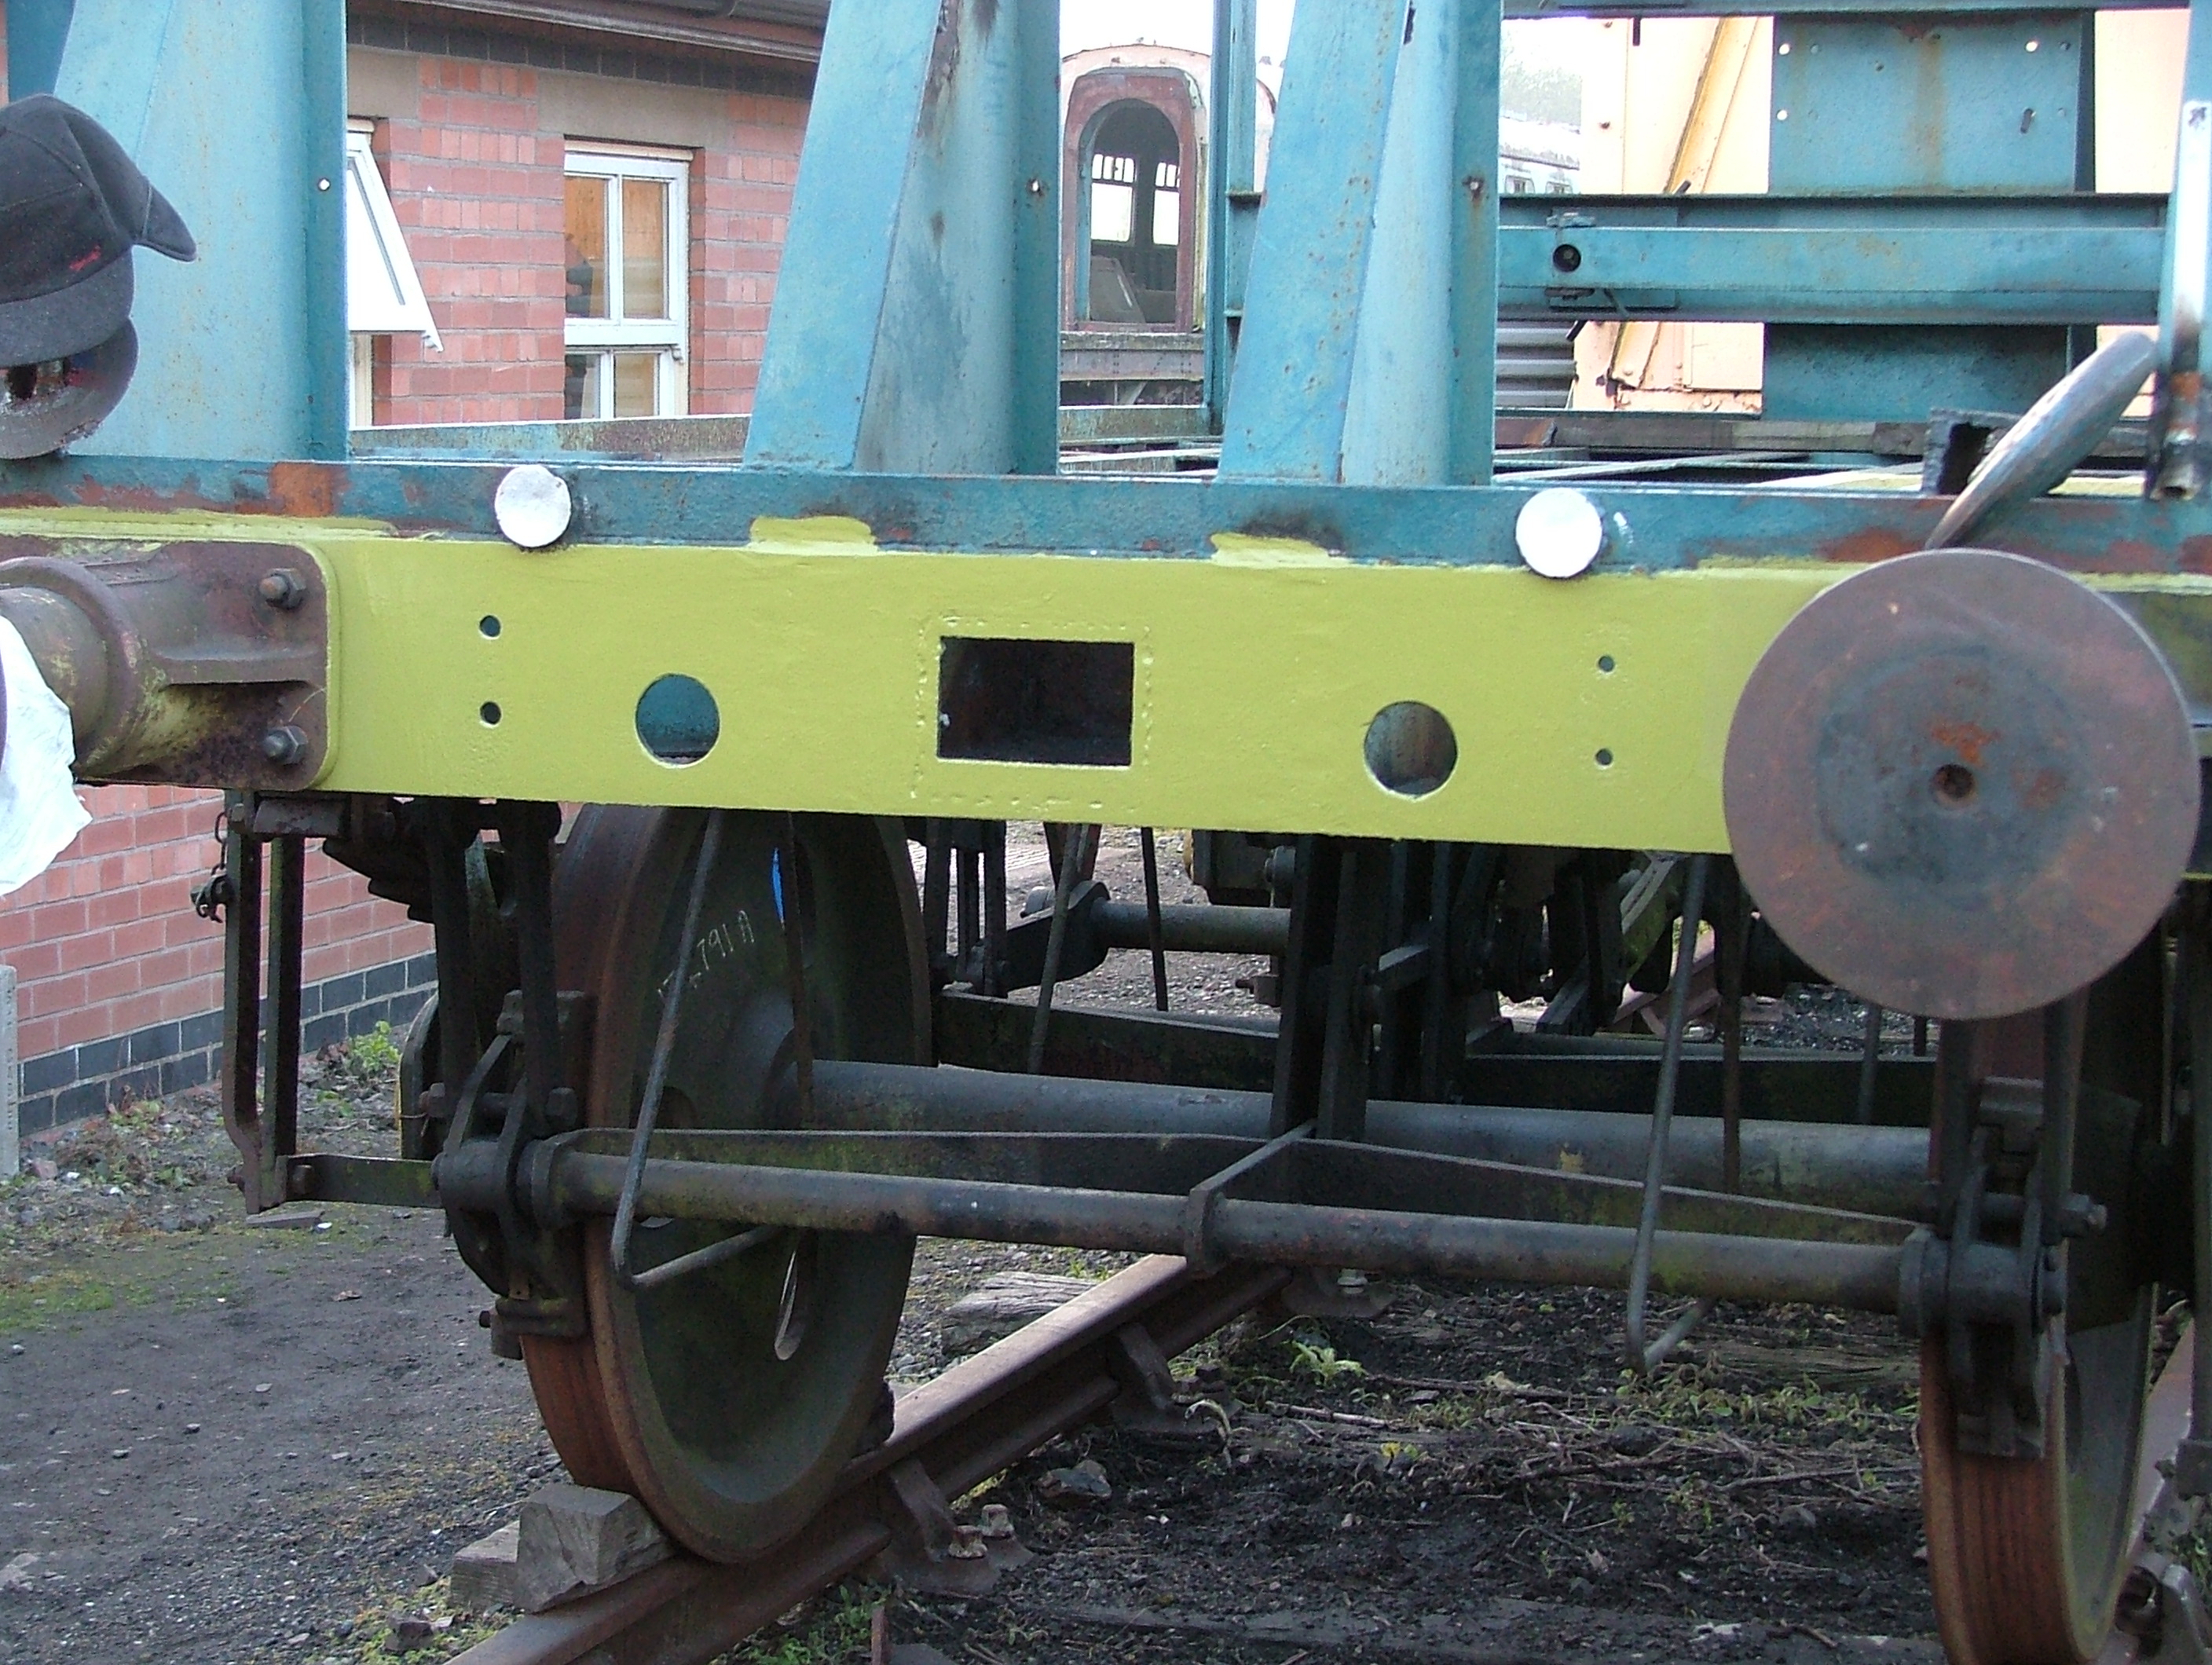
And so to Sunday. Shawn completed the tidying up of the north
end underframes, while I made a start on the south end (pictured).
These pieces of metal welded to the frame are the remnants of the
Freightliner dragbox, and I made three cuts flush with the frame:
one either side of the piece shown, and one out of shot to the
right. You can just see a hairline crack between the original frame
and the later plate; hopefully the nearest plate is now just about
ready to come off with a hammer and chisel. |

Photo © P. Hetherington 07/05/06 |
The other job on Sunday was the grinding flush and painting with
primer of the outer face of the south end headstock. This now
matches the north end which was done the previous weekend. |

Photo © P. Hetherington 07/05/06 |
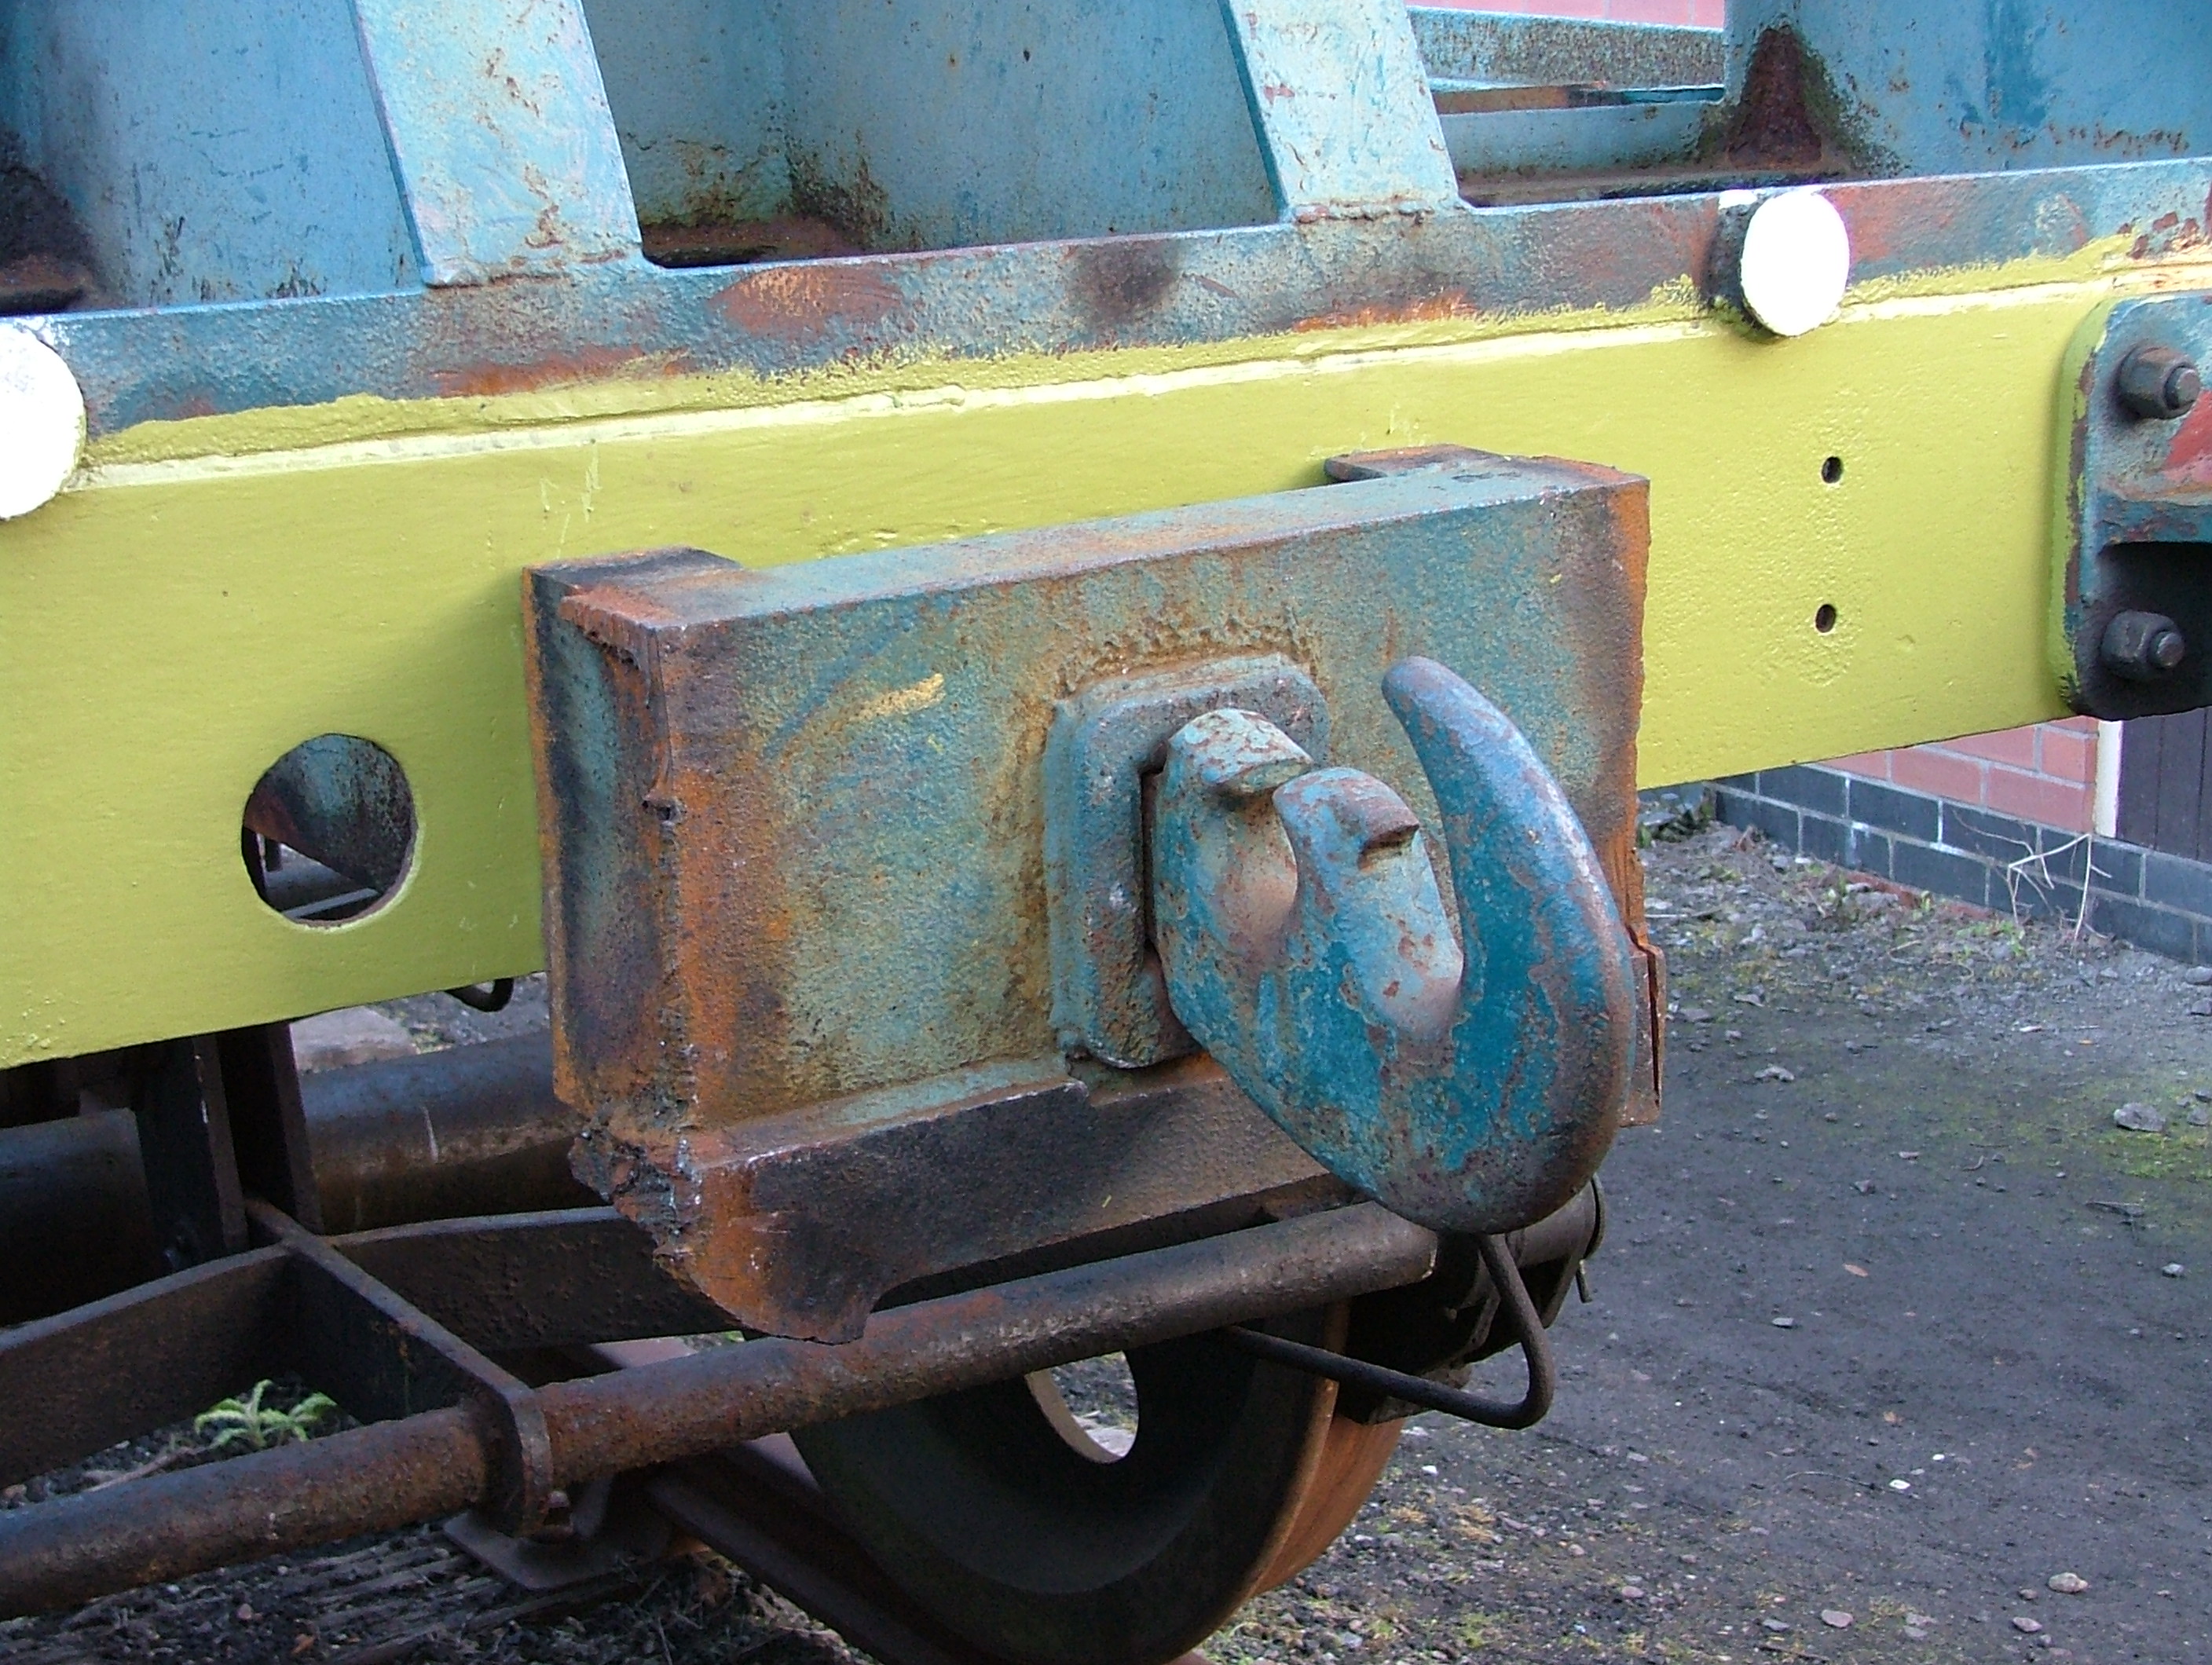
Finally, we loosely re-fitted the drawhooks at both ends of the
wagon. This is purely so that the wagon can be moved if necessary;
it won't now be receiving any attention for a week or two due to
the annual S&T 'work week'. |

Photo © P. Hetherington 28/05/06 |
Work resumed on the rather tedious job of removing the last
bits of the south end Freightliner dragbox. On the left, the
first piece has already gone - as indicated by the remnant of
weld in the foreground - and the chisels are being used to work
the second piece loose. On the right hand photo this piece has
gone.
This piece was, in fact, a remnant of the thick vertical plate
which sat in the centre of the dragbox. Curiously, in each case
there was a small spacer above this, apparently not welded to
anything. |

Photo © P. Hetherington 28/05/06 |

Photo © P. Hetherington 28/05/06 |
By the end of Sunday (left) the left hand side had been cut and
ground flush with the frame into the corner, and a cut had been
largely completed across the centre of the wagon.
By the end of Monday (right) the right hand side had almost been
done to match, with just one small piece not quite freed from the
wagon.
To be continued... |

Photo © P. Hetherington 29/05/06 |

Photo © P. Hetherington 04/06/06 |
It was far too hot to be angle grinding wearing a hat, goggles, ear
defenders, dust mask and three layers of clothing - so that is exactly
what I did. Well, mad dogs and Englishmen, as they say...
On the left, another chunk of Freightliner dragbox is about to
fall off, and on the right it has gone, with another piece on its
way. |

Photo © P. Hetherington 04/06/06 |

Photo © P. Hetherington 04/06/06 |
Another couple of pieces came off the east side towards the
end of the day, leaving just the large central plate (which
needs cutting along the back), and one small piece on the left
which in theory should come off, but is being stubborn.
Nearly there! |

Photo © P. Hetherington 04/06/06 |

Photo © P. Hetherington 03/08/06 |
On Thursday I completed the grinding of the area where the coupling
chain hook had been removed, and for good measure removed the 'double
arrow' plate from the east side of the wagon; the west plate was removed
over a year ago! This was a fairly quiet day as most of it was spent
doing 'other things'. |

Photo © P. Hetherington 04/08/06 |
Having sought expert advice (which, in a nutshell, was "just
get on with it!"), I concluded that the only sensible way to get
the new steel into the dragboxes was to cut slots in the original
wagon frame. These have been positioned where the frame was a little
wasted anyway, and where a gusset plate will ultimately strengthen the
area once the slots are welded back up. |

Photo © P. Hetherington 04/08/06 |
Having cut the slots, the new channel sections turned out to be
about a quarter of an inch too long, so a sliver was cut off the end
of each piece. By the end of Sunday all four pieces had been slotted
into position, although they're not finished yet as the top two pieces
need drain holes, and the bottom two need to be cut down to the correct
depth. |

Photo © P. Hetherington 20/08/06 |
It was a damp and miserable sort of day - just the sort of day when
you'd like a nice indoor job to do. So I spent the day drilling holes in
bits of steelwork.
First up was the new lamp bracket I'd made a few weeks earlier. I have
to confess that this isn't perfect. For a start the steel is metric and
hence slightly on the thin side, although this shouldn't matter. Secondly
I got the bends slightly too far apart, so it steps out by about 1/8"
more than it should, although I doubt anybody will notice. And thirdly, I
drilled the holes slightly too far apart, which might be a problem when
it comes to fitting it; a bit of trial and error should determine which
wagon it fits on best; with two wagons to repair and three of the four
lamp brackets being original, I have some flexibility.
Anyway, this new bracket still needs the ends cutting to length and
rounding off, but it's 'nearly there'. |

Photo © P. Hetherington 20/08/06 |
Next I drilled three holes in each of the three vacuum dummy brackets
I'd made previously. These are virtually ready for painting now, though I
do need to tidy up a couple of rough edges with the grinder. |

Photo © P. Hetherington 20/08/06 |
And so back to the dragboxes. The two top pieces will sit
'U-shaped' in the dragbox, so need drain holes. I measured the better
dragbox on my Conflat, and decided that a 1.1/4" hole was large
enough. The drain holes sit off-centre, presumably to avoid dripping
water on the drawhook shaft. Both of those for the Palbrick have been
drilled; the Conflat will ultimately need the same treatment as the
top dragbox channels are in a pretty poor state. |
| Sorry, no photo. |
Having drilled the top pieces of channel, the next job is to get
the lower pieces to sit correctly in the dragbox. This involves
cutting them to depth - but a closer look at the Conflat revealed
that this wasn't going to be a simple job! In the centre, the lower
channel seems to be 2.1/4" deep, but the lower edge then tapers
to either side, the outer dimension being something like 2.1/16"
with the taper running for a distance of 6.3/4". This should
allow it to sit nicely within the '[' and ']' channels which form the
sides of the dragbox, the top and bottom of these channels being
tapered on the inside.
Obviously the channel isn't 6.3/4" deep, and there is a certain
amount of interpretation involved in measuring off a fully assembled
(and slightly rusty) wagon, but these figures do seem to give something
like the right angle. I marked out the channels for both dragboxes, but
I didn't actually make the cut as the light was fading.
Incidently, the other cut is likely to be different, as the 'outer leg'
of the channel won't sit on the tapered edges of the longitudinal
framework, but on the inside edge of the headstock. So presumably it
will be a straight cut at something like 1.1/16", but some more
careful measurement will have to happen before I commit myself! |

Photo © P. Hetherington 27/08/06 |
A large part of Sunday was spent getting the lower dragbox channel to
fit properly at the south end of the wagon. For some reason this end
decided to be awkward and wouldn't sit steadily in position without a lot
of fettling.
On Monday the upper channel was finished off, by cutting off a 3/16"
slice the length of the 'outer' edge, rounding off the 'outer' corner,
and tapering the outermost 3" of the 'inner' edge. This allows the
dragbox channel to fit neatly inside the wagon underframe - itself made
from steel channel though of a different size.
The upper channel was then lifted into place - strangely, after all of
the hassle with the lower channel, it seemed to fit first time! - and
temporarily jammed up with various nuts and washers. This allowed the
drawhook to be loosely fitted - just to prove that it would fit! |

Photo © P. Hetherington 27/08/06 |
The north end then received similar treatment and both dragboxes
are now nominally ready for welding. There are a few other little jobs
to do first though.
I'd like to clean up the inside of the dragboxes while they're still
relatively accessible. In particular, the corrosion on the 'back wall'
of the dragboxes - which isn't structural - is the worst anywhere on
the wagon, presumably because access was so awkward that the wagon's
1980s refurbishment missed it. I've tried just about everything else and
have concluded that a needle gun is required to get in there - now I
just need to get hold of one! |

Photo © P. Hetherington 03/09/06 |
The other task on Sunday was to wire brush the vacuum cylinder
ready for painting. I removed the old paint from the sides and top,
but ran out of time before I could repaint it. An overnight shower
meant that it needed wire brushing again on Monday - but fortunately
it only needed a quick 'once over'. Then it started to rain again
so I painted it in primer quickly! |

Photo © P. Hetherington 03/09/06 |
On Monday I also finished off the new lamp bracket and three vacuum
dummy brackets I'd made a few weeks earlier. Most of the effort went into
the lamp bracket as it needed its ends trimming and rounding off.
At the end of the day four vacuum dummy brackets and three lamp brackets
- including some originals - were painted in primer. Each wagon needs two
of each; the 'extras' are destined for my Conflat when its turn for
restoration comes. |